🧶neo4j文档整理
1. 🛠环境部署方面
1.1 版本选择
对于neo4j版本方面,3.x 对应 Java8,4.x 对应 Java11。

现在87和88机器上使用的都是4.x版本。
1.2 部署
🐋docker中部署
拉取 neo4j 镜像,指定 7474,7687 端口的映射。
但是一定要指定import和data映射文件夹
🖥服务器直接部署
下载解压ce版本
更改/conf/neo4j.conf文件,之后启动 ./bin/neoj
# With default configuration Neo4j only accepts local connections.
# To accept non-local connections, uncomment this line:

#特别注意:默认是注释的,不开启,外网不能访问web端口neo4j
dbms.default_listen_address=0.0.0.0

# You can also choose a specific network interface, and configure a non-default
# port for each connector, by setting their individual listen_address.

# The address at which this server can be reached by its clients. This may be the server's IP address or DNS name, or
# it may be the address of a reverse proxy which sits in front of the server. This setting may be overridden for
# individual connectors below.
#dbms.default_advertised_address=localhost

# You can also choose a specific advertised hostname or IP address, and
# configure an advertised port for each connector, by setting their
# individual advertised_address.

# By default, encryption is turned off.
# To turn on encryption, an ssl policy for the connector needs to be configured
# Read more in SSL policy section in this file for how to define a SSL policy.

# Bolt connector
dbms.connector.bolt.enabled=true
#dbms.connector.bolt.tls_level=DISABLED
dbms.connector.bolt.listen_address=0.0.0.0:7687
#dbms.connector.bolt.advertised_address=:7687

# HTTP Connector. There can be zero or one HTTP connectors.
dbms.connector.http.enabled=true
dbms.connector.http.listen_address=0.0.0.0:7474
#dbms.connector.http.advertised_address=:7474

# HTTPS Connector. There can be zero or one HTTPS connectors.
dbms.connector.https.enabled=false
dbms.connector.https.listen_address=0.0.0.0:7473
#dbms.connector.https.advertised_address=:7473
2. ☕java开发方面
2.1 设置驱动启动
不推荐,推荐springboot的自动配置
//设置driver
Driver driver = GraphDatabase.driver("bolt://192.168.216.131:7687", AuthTokens.basic("neo4j", "123456" ));

//打开session
Session session = driver.session();

//执行语句
String cql = "create (n:Person{name:$name,title:$title})";
            String insert_test_str = session.writeTransaction(new TransactionWork<String>() {
                @Override
                public String execute(Transaction tx) {
                    Result result = tx.run(cql,parameters("name","diomchen","title","The Code Hero"));
                    return "Create Node OK!";
                }
            });

//关闭session
session.close();

//关闭driver
driver.close();
2.2 springboot自动配置
#yml基本配置
    neo4j:
      uri: bolt://<host>:7687
      username: neo4j
      password: 123456
通过cypher语句实现操作
neo4j对象:
@Data
@Node(labels = {"Addresstxs"})
public class NAddresstxs {
//    //自动生成id
//    @Id @GeneratedValue
//    private Long id;

    //交易地址表Id
    @Id
    private String addresstxsId;

    //交易地址
    @Property(name ="address")
    private String address;
repository:
@Repository
public interface AddresstxsRepository extends Neo4jRepository<NAddresstxs,String> {

    @Query("create (n:Addresstxs{ addresstxsId:$addresstxsId , address:$address , type:$type}) return n")
    List<NAddresstxs> addAddresstxs(@Param("addresstxsId") String addresstxsId, @Param("address") String address, @Param("type") Integer type);

    @Query("match (n) return n")
    List<NAddresstxs> getAddresstxs();
    /*
    	特别需要注意返回的类型,否则会报以下问题
    */
}
org.springframework.data.mapping.MappingException: The schema already contains a node description under the primary label Addresstxs
cypher语句在 3.x 和 4.x 中有所不同
//java中cql(3.x)
String cql = "create (n:Person{name:{name},title:{title}})";

//java中cql(4.x)
String cql = "create (n:Person{name:$name,title:$title})";
通过Neo4jTemplate
pom:
<dependency>
    <groupId>org.springframework.boot</groupId>
    <artifactId>spring-boot-starter-data-neo4j</artifactId>
</dependency>
注入:
@Resource
Neo4jTemplate neo4jTemplate;
其实和 MongoTemplate 操作一样,都是save,find等等,当然也支持自定条件。
3. 💾数据导入Neo4j数据库方面
导入数据到neo4j是最影响使用体验的。
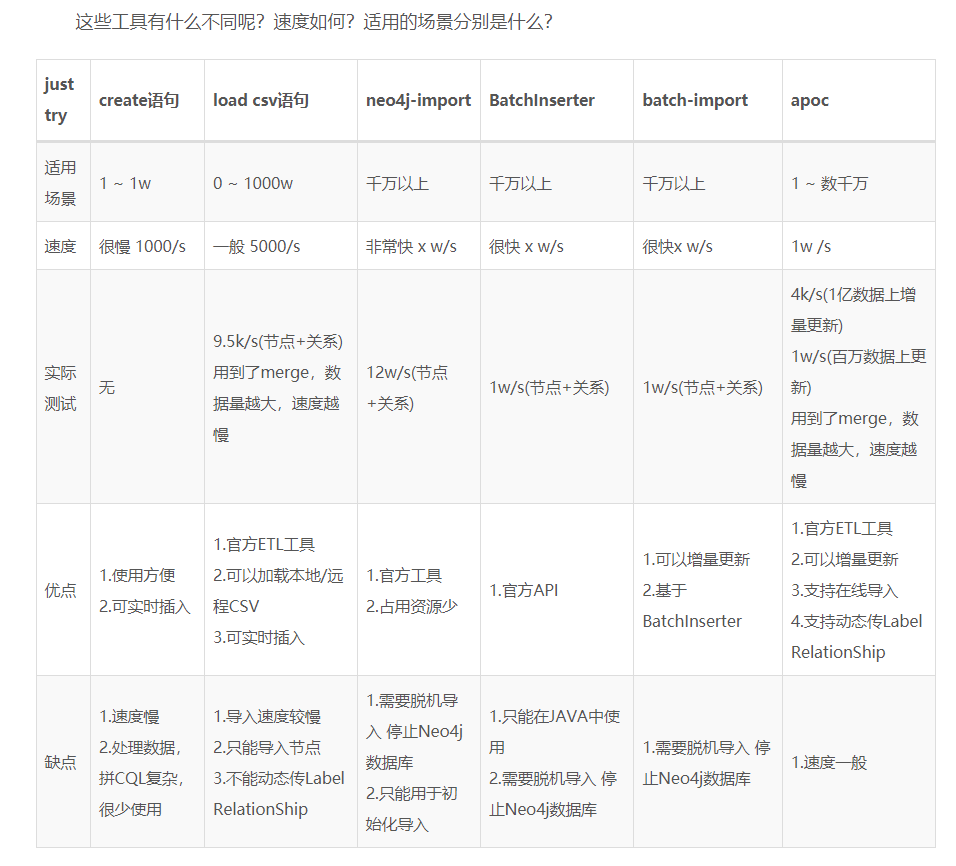
3.1 导入方式比较
基本方式可以见下图,但是现在可用的只有create语句,load csv语句,apoc插件,其他的基本因为缺少维护而废用。
第一种 create 语句,可以说是非常之慢,实际使用远低于下图的1000/s速度。
第二种 load csv 语句,也是现在用的,3k+ 节点和12k+ 关系 导入花了 30 分钟左右 。
但是网上有创建约束的方法解决,也有通过添加**:auto using periodic commit 200** 控制提交频率的方式来提高导入速度,这些都还未尝试过。
最后一种 apoc 插件导入,还未使用,暂不做评价。
3.2 CSV数据创建和导入
📃CSV规范
Relationships规范
- START_ID
- END_ID
- TYPE
所以对于Node就需要有能够建立关系的标识性属性。
cypher 语句实际使用中,对于 TYPE 属性也并非硬性要求。
⛓CSV创建与导出
- java先从mongo中读取所需数据
- 创建导出csv所需属性的对象
- 利用fastjson插件,将对象列表转成json字符串
- 利用jackson插件,将json字符串转成csv
- 导出csv文件
工具类:
//对象列表转csv public static<T> void Object2Csv(List<T> objectList,String savePath) throws IOException { JSONArray jsonArray = new JSONArray(); jsonArray.addAll(objectList); String ss = jsonArray.toJSONString(); JsonNode jsonNode = new ObjectMapper().readTree(ss); CsvSchema.Builder csvSchemaBuild = CsvSchema.builder(); JsonNode fObject = jsonNode.elements().next(); fObject.fieldNames().forEachRemaining(fieldName -> {csvSchemaBuild.addColumn(fieldName);}); CsvSchema csvSchema = csvSchemaBuild.build().withHeader(); OutputStreamWriter ow = new OutputStreamWriter(new FileOutputStream(new File(savePath)),"gbk"); CsvMapper csvMapper = new CsvMapper(); csvMapper.writerFor(JsonNode.class) .with(csvSchema) .writeValue(ow, jsonNode); } //对象列表转json public static <T> void Object2Json(List<T> objectList,String savePath) throws IOException { JSONArray jsonArray = new JSONArray(); jsonArray.addAll(objectList); String ss = jsonArray.toJSONString(); save(ss,savePath); } private static void save(String jsonstr,String filename) throws IOException { OutputStreamWriter osw=new OutputStreamWriter(new FileOutputStream(filename), "gbk"); osw.write(jsonstr); osw.flush(); osw.close(); }
🧣CSV导入
只尝试过采用LOAD CSV语句的导出方式。
@Query("load csv with HEADERS from \"file:///addrN.csv\" as line merge (n:Address{address:line.address}) ") void optInAddAddressNode();
merge 的好处,它会判断库里面是否以及存在该相同节点,若有,则不会创建,反之,则会创建新节点。这样就避免了库里面存在多个重复节点。
参考资料: